Something on your mind? ? ? :-)

If you would like to leave a comment to tell me what you like or if you would like to share an experience you have had, have suggestions for new adventures, or would just like to share what's on your mind, please feel free to do so! I would really, really love to hear any feedback you would care to offer!

When you click on the comments link at the bottom of the post, you will be presented with choices for logins, if you do not already have one of the accounts listed, or you do not choose to login with that account, you can always choose the anonymous option, in which case your name would come up as Anonymous! If you choose to use one of the other log in options, your name would appear as the public name you list for that account. For example, mine would appear as Willow's Quiet Corner, and, of course, your email would not show!

Thanks! And, again, thanks for stopping by! I really hope to hear from you and to see you again soon! Let me know how you think I am doing! :-)
Showing posts with label recipes. Show all posts

Wednesday, February 29, 2012

Homemade Laundry Powder


One day, whilst searching online for homemade cleaning product recipes, I came across several sites for homemade laundry soap.  Most were for liquid gooey looking messes in 5 or 10 gallon buckets and I was looking for a soap powder.  Those I found were all pretty much the same recipe with only slight differences to them.


I was curious to try them as I would like to be using things that are less harmful to the planet and might save a few dollars.  So, I finally decided to give it a try.

Yes, I inherited blue counter tops when I moved in here . . . don't judge!  ;)

I picked up some Zote laundry soap.  I had to go to one of the local ethnic supermarkets to find it.  But, they are close, so I didn't have to drive way out of my way to find it.  Many of the recipes indicated you could also use Fels Naptha or even Ivory.  But, Fels and Zote are labeled as specifically for laundry.  The Zote is a pretty pink and has a nice clean smell.  That was the first thing I noticed when I opened the package.


Unfortunately, I was so excited to finally start on this project, I forgot to get photos of the packaging on the Zote or a pic of the unwrapped full bar.  I remembered about half way through the second bar!  Whooops!  :)  I tried just using a cheese grater on the soap, but it didn't get as fine a powder as I was looking for.  So, after I ran it through the grater, I plopped it into my mini food processor.  It is a breeze to clean compared to my full size one!  Better!  I tried just running chunks of the soap through the processor, but it was still a little large for me, knowing I may have problems with getting it to dissolve, so I used the cheese grater and the processor on all the rest.  I figure, I wash those items in soap anyway, so it should be safe to use them for this as long as I wash them right afterwards and don't let them sit around in the soap too long to absorb the scent.


Right now, I am just using a portable washer that my mom gave me to bail me out until I get a new washer.  (It's a long story!)  Thanks, mom! ! !  **waiving at mom**  I am limited to using cold water, so I plan on dissolving the soap in a little hot water first a few minutes before I add it to the machine.  I'll put a load in in a few minutes so I can report back how this works for me by the end of this post!

So, the details:

     2 bars grated soap (Zote, Fels Naptha, Ivory or similar)
     2 Cups Borax
     2 Cups Washing Soda (not the same as baking soda, but there were recipes    that used the baking soda as well)

Use 2 tablespoons per wash.  Since this doesn't create suds, it is claimed to be safe for front as well as top loading machines.  I can't vouch for the front loader, so don't hold me to this!  If you want to try it, you might want to do your research first!  I ended up with probably about 8 cups of laundry powder.  I did not actually measure it, I am just eyeballing it for an estimate!

I put the scoop in just because I thought it would
look better than a puny little measuring spoon!  ;)
And the results:


     ** Note:  I put 4 tablespoons in a cup and added hot water and stirred it up, and stirred and stirred.  It didn't quite fully dissolve, but close . . .  so I poured some into the washer while it was filling with water and then added the clothes just a bit later, but before it was filled with water.  I did the first load and then during the time it took to do the first load, the soap that was left in the cup had turned into a thick gel-like substance.  But, it turned more liquid as I stirred it up again.

     1st load - 1 small light blue blanket
          came out clean, smelling fresh - no visible soap residue
     2nd load - 3 black pants
          came out clean, smelling fresh - no visible soap residue
     3rd load - 2 bath rugs
          also came out clean, smelling fresh with no visible soap residue


     **Note: It seems that even though the soap did not fully dissolve, I did not see any traces of it left in my clothes or inside the washer.  I don't know if there might be any build up inside in places that are not easily visible, but I feel like it pretty much either did get dissolved in the wash or got drained out during the drain cycles.

Anyway, so, there you have it!  I think it works for me!  If you try it, I hope it works for you as well!

BTW . . .  Happy Leap Year Day!  ;)

Monday, January 16, 2012

Flatbread Obsession


Ever since I first saw this post by Deb over at the Smitten Kitchen, I have been enamored with . . . well, in lust with . . . oh alright, . . . completely, madly, insanely OBSESSED with flatbread.  There, I said it.  Are ya' happy now?  


I tried it with the honey and salt flakes.  And, it was very good, but I am not a huge honey fan.  So, then I started making it with just fresh thyme, toasted sesame seeds and shredded parmesan.  Addiction!  Major addiction.  I'm talking get-the-crew-ready-and-stage-an-intervention serious addiction.


Then, it was the barbeque sauce, toasted sesame seed, shredded parmesan and the barest whispers of thinly sliced red onion flatbread.  I was making my own basic barbeque sauce from ketchup, brown sugar, lemon juice and pepper practically by the gallon to get my fix.  Pounds and pounds of this stuff I have pounded down.  Greedily eating every last little crumb.  Sometimes consuming practically the entire batch in one sitting.  And then nearly licking the plate clean.


You see, the dangerous thing is that there really isn't anything to these.  Really.  Only a handful of ingredients that come together in the blink of an eye and bake up in less than ten minutes.  I had no idea that a bit of flour, baking powder, salt, water and olive oil could be such a magical combination.  The toppings are up to you.  Go ahead, let your imagination run wild!  You know you want to!


I'm not sure if I should kiss Ms. Smitten Kitchen or banish her from my reading list forever.  I was going to post about this previously, but couldn't stop eating long enough just couldn't get any photos I really liked.  So, if you want to see really great photos of the process, run over to her kitchen here and here.  She makes her kitchen look very dramatic, like all her ingredients are on stage and you really expect them all to be making a bow to thunderous clapping and ear-splitting whistles of the audience in the final pic dramatic!


Then, I happened upon some flatbread at Whole Foods that was made with rye flour and topped with caraway seeds and shredded Cotswold cheese.  I love Cotswold cheese!  For those of you who may not be familiar with Cotswold, think cheddar married to Ranch Dressing.  At this point, I was beginning to suspect a conspiracy.  Once I found Whole Foods also carries rye flour, I knew for certain.  And now, I have been craving a whole new taste sensation.  


Not so horrible, you might think.  But, . . . since I love them all and can't decide which one I like best, I now have to make three different batches to satisfy my growing addictions.  Soon, I'll have to pick up a second job or turn to a life of crime to support this habit.  The neighbors must be wondering about the stacks and stacks of empty flour sacks piling up around here by now.  I suppose I should start sneaking them out to the dumpsters in the dead of night to hide my shameful secret.  Hmmmmm . . .  they'll probably figure it out when I start waddling around here, anyway.


Go here, get the recipe and go make this now.  I promise, you won't be sorry!   Especially if you try it with the BBQ sauce and red onion.  


Well . . . go on! . . . . . . . . . my goodness . . . . what are you still doing here? ? ?   There's yummy goodness to be found in just minutes in your kitchen! ! !  Shooo!


Well, gotta run . . . ah've gots flatbreads to eat, my dahlings . . .  I'd offer you some, but as you can see . . . I barely have enough for myself.  But, please don't forget to stop back by sometime after you get your flatbread fix!  If you try it, let me know what you think!  Better yet, let Deb know what you think!  :)


Saturday, May 28, 2011

Around the Garden


DANGER!  DANGER!  Will Robinson!  (Does anyone else remember that series? ? ? )  Long, wordy post alert!  I guess I am making up for the length between my posts!  And, BTW, cuz . . . mom and I were about to send out a search party for you over on your 9 Acre Farm!  I'm glad to see you are back!  I am envious of your garden!  It is soooooo pretty!  And, compared to mine . . . gi-normous!


One of my colleagues brought me some honey he had collected from his hives.  It was delicious spread over toast.  I had never before tried honey that someone I knew had collected, so it was a bit of a treat for me!  I am anxious to try it in other things as well . . . tea, baking, etc . . .  It was such a thoughtful thing to do, I was surprised and really appreciative!   How nice it would be to have the room to have a nice, large garden with enough space for all your vegetables, berries, flowers, a small orchard, a  compost area and a spot for a hive . . . or two . . . and maybe some horses, and a pool, and . . .  well, one can dream, right?  **sigh**  But, at least I have a little space for a tiny garden . . . which is, afterall, better than not having one at all!

Things are progressing pretty nicely with the things I did manage to get planted into my little garden.  I think now, it is a good thing a lot of the things I tried to start from seed didn't thrive!  (MY error, not the seed company's error.  I get too heavy handed with the watering!  I bought this seed a couple of years ago, and nearly everything at least germinates!  What I didn't drown was eaten by the darn roly-polys!) The things that did manage to survive me and the "bugs" (I know roly-polys aren't technically bugs/insects), seem to sprawl much further than I thought they would!  You can see I haven't done a lot of gardening in the past, because if I had, I would probably have known this would happen!  

I thought I could train my pumpkins, watermelon and squash to climb up a trellis and that they wouldn't take up as much room that way!  Well . . . that seems to be only partly right!  I needed taller, stronger trellises and a better idea of how much room they would still need diameter-wise when they send out their leaves!  Goodness!  My little modification of the square-foot garden didn't even come close to anticipating how many "squares" each plant would need!  It would seem they need my entire raised bed garden!  ;-)


I have planted a few things I have never eaten before, or have just recently been introduced to, as in the case of fava beans.  YUM! ! !   I have been buying them from my local farmer's market and making a spread for toast with them.  Sautee them in a little EVOO and garlic, add a bit of salt and pepper, puree them and spread over your favorite crusty bread toasted, drizzled with a bit more EVOO if you wish.  Delish!  I planted my fava beans a bit late . . . apparently they do not like hot weather, but so far, they are doing too badly.  I think our May Gray and  soon-to-be June Gloom are helping, not to mention a bit of unseasonably cool spring weather.

I only have two plants as I didn't have any idea what to expect when I first planted them.  One of them was nearly killed by those darn, voracious roly-polys!  I caught them encircled around the base of the smaller plant and chewing it to bits.  I can't bring myself to kill bugs on purpose, so when they rolled up into their little balls, I picked them up and threw them as far away from my garden as I could, knowing full well, within a few minutes, they would probably be back . . .  When I looked at the other one, I could see there was a LOT of damage to the main stem on it as well.  

I headed into the kitchen, grabbed a spray bottle, added a drop of dish soap and water and went out to spray my poor little favas, hoping to save them!  I also noticed they had developed a colony of black aphids, so I hosed them off and sprayed them down with the soapy water . . . That was a few days ago, and so far, so good . . .


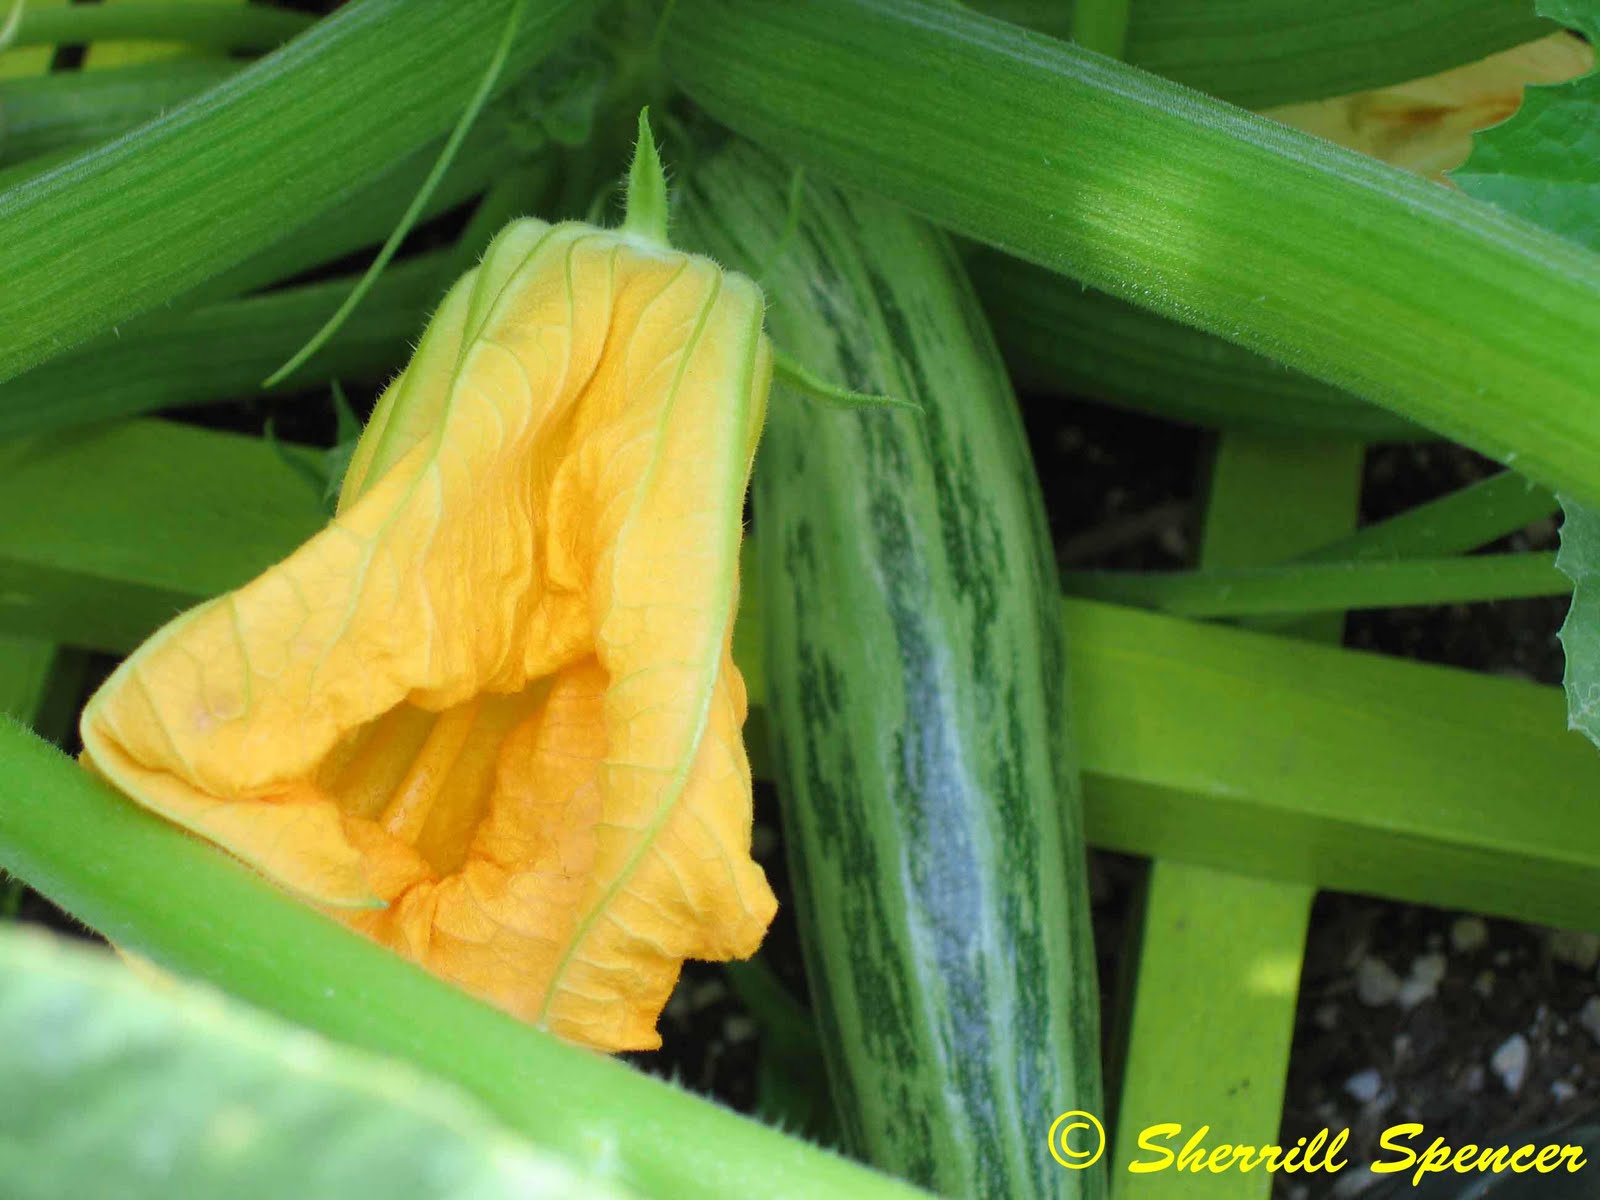
One of the things I hadn't tried before was the Cocozelle zucchini.  It is an Italian heirloom variety, which I ordered from here.  I like zucchini, but I can't honestly say I LOVE zucchini, but I was anxious to try this one.  I got my first one last weekend.  I didn't even see this guy coming on!  I just happened to notice him peeking out from under the canopy last Sunday.  This time I went into the kitchen to grab a knife!  :-)  I cut off a slice and tasted it raw.  Very good!  I could tell it would be great in salads, on a veggie sandwich (grilled or otherwise), etc.  I sliced the rest of it up and tossed it into the skillet with some butter and salt and pepper.  My taste buds were very happy!  Yummmm, yummmm!


I have also planted some Patty Pan and Yellow Straight Neck Squash.  So far, the plants look pretty good and strong.  I think I am going to have squash coming out my ears!   I am rethinking the placement of these little solar lights, though.  I obviously wasn't thinking when I put them around my little garden . . .  now, what does light attract at night? ? ?   Perhaps things I do not want in my little garden!  I may just have to take these out and put them around my little patio instead!


I have also planted a couple of pumpkins, Lumina and Sugar Pie.  Both plants have some little baby pumpkins on them about the size of ping pong balls, but I was only able to get a decent shot of the Lumina.  By the way, I got all my seeds from Botanical Interests.  I love their selection and the seeds are pretty darn hearty!  Those that I don't drown, that is!  I am just learning to grow from seed, and there is a little bit of a learning curve involved!  But, just look at these lovely plants when I don't "care for" them to death!  Everything came from BI except the tomatoes, rhubarb and asparagus!  Those I started from plants purchased at a big box store or a local nursery.


I wish I had had my camera with me while watering a little while later, as I found an Alligator Lizard just hanging out, basking in a tiny patch of sunlight that managed to squeeze through all the squash leaves.  Pretty little guy, about 12" long, pale "tannish" skin who didn't move while I was talking to him and thanking him for making my garden his home.  I asked him to stay there and prepare for his close up while I got my camera, but alas, he must have had some other previous, very pressing and important engagement, as he was no where to be found when I got back.

Out of control volunteer Yellow Pear Tomato - nearly as tall as I am!
I also have about 3 varieties of tomatoes growing out there.  The volunteer yellow pear tomato seems to be hell-bent on taking over the tiny little back yard again.  I think he is secretly jealous of all the space the squash, pumpkins and rhubarb are taking up and is in competition with them.  My poor little Roma tomato just looks miserable.  I am not at all sure what to do with her.  I am thinking I should take her out of her pot and try a different pot/soil.  She is trying valiantly to produce fruit, but I was really hoping to be able to make her really happy so she would thrive and produce lots and lots of tomatoes for my pasta and bruschetta.  My lone slicing tomato, Big Beef, is happier than my Roma, but not exactly thriving.  Both the Roma and the Big Beef are in pots, while the volunteer is coming up in the yard (and not in the most convenient spot, I might add!).  Perhaps I will have to give in and try to find another spot in the yard where I can plant my other tomatoes directly in this obviously rich, previous farmland!


You can just barely see my poor asparagus fighting for dear life just behind the rhubarb and
right between the pumpkins!  Come on asparagus!  I'm rooting for you!  No pun intended!
My rhubarb is going great guns!  I was also surprised to see how much space it would spread out as well!  It is crowding out my poor little asparagus, which doesn't seem well prepared to fight for sun (and air!)  with the rhubarb.  I am now thinking I should have switched their placing with each other.  hmmmmmmmm . . .   I was hoping both would co-exist in a special section of my raised bed planter I had set aside just for the two of them, but the asparagus just doesn't seem to be able to stand up to the big bully leaves of the rhubarb.  I was a kid all those thousands of years . . . errrrr . . . , I mean . . . , a couple of years ago when I last saw it growing . . . somehow I don't remember it taking up soooooo much space!  What I have read says you should not harvest the first year to allow the plant to gather its strength . . . but  . . . it looked soooo robust and full, I couldn't resist picking some for the cake below!  And, if it is this strong now . . . what in the world is it going do next year!   I'd better run out to buy a machete . . . .


My mom had sent me this recipe for Rhubarb Cake and I was itching to try it . . . sooooo, I picked about 6-7 stalks and baked me up some cake and it was scrumptious!  (By the way, I really probably should have had 9-10 stalks to really do it justice . . . I only ended up with just over 2 1/2 Cups)  I topped it with some Fresh Strawberry Frosting and  . . .  well . . . you just have to try it!  Really! ! ! Thanks, mom!  I'll put the recipes at the end of this post if you do want to try it.  The amount of sugar in this thing is astounding, but honestly, we all deserve a little treat now and again, don't we?  I mean, I won't be making it on a weekly basis . . . for now, anyway . . .  ;-)  I have to wait until next year, when my rhubarb plant is stronger, right?  Then all bets are off!  I'd better run out and buy a treadmill, as well . . . 

I didn't get any pics of the cake . . .  sorry!  But, it really wasn't a thing of any extraordinary beauty, just a regular cake in a 9"x12"x2" glass pan, with a thin layer of frosting.  Just a cake . . . that was really, really tasty!  No special decoration, etc.

Anyway, here are the recipes!  I hope you'll try them and let me know what you think!  See you over the garden gate!


Rhubarb Cake - not sure of the origins of this one


Yellow Cake Mix - homemade or from a box (my grandma liked Duncan Hines, so that is what I used)
Rhubarb - 3 1/2 Cups diced
Sugar - 1 Cup
Condensed Milk - 1 12 oz can


1.  Preheat oven to 350 degrees F and prepare baking pan - grease/flour.
2.  Mix cake mix according to directions on recipe or box (depending on which you are using!) - pour into greased/floured 9"x13"x2" cake pan.
3.  Sprinkle diced rhubarb evenly all over the top.
4.  Shake 1 C sugar evenly all over the top.
5.  Gently pour canned condensed milk evenly over the entire mixture.
6.  Bake at 350 degrees F until toothpick comes out clean - about 50-60 minutes
7.  Frost when cooled.


Strawberry Frosting - from this site


Strawberries - 1/2 pint - 8 oz
Sugar - 1/4 Cup granulated
Butter - 4 Tablespoons - softened
Powdered Sugar - 3 - 4 Cups


1.  Wash strawberries, then hull and slice.
2.  Put strawberries into a bowl, sprinkle with the 1/4 granulated sugar and mix well.
3.  Cover and refrigerate for at least 2 hours or overnight.
4.  Drain excess juices from strawberries (I used mine to pour into fresh squeezed lemonade for a very yummy strawberry lemonade!).
5.  Crush or mash the strawberries (I put mine in my little mini food processor for a few pulses)
6.  Beat butter until smooth.
7.  Add 3 cups of powdered sugar and the crushed strawberries.  Slowly beat until the sugar is blended in, then beat on medium speed until fluffy.  Add more powdered sugar, as needed, until the frosting is a nice spreading consistency.  (I couldn't bear to keep adding sugar, so mine didn't get fluffy!  But, it was still DE-licious! ! !)

Wednesday, August 4, 2010

Building My Patio - Part 1

My patio - the almost finished version.
Well, hello again!  In our previous chat, I had mentioned that building my patio was a story for another time.  I think now is as good a time as any to at least begin the tale with the first stage of that project.  

I had just moved into my new place and was anxious to put my own little stamp on it.  I planned and measured and dreamed and somehow managed to convince myself that even though I had never tackled any project of this nature, or had any experience with construction of any sort, or had even watched any projects of this nature being built by anyone else, that I would be able to do all of this myself.  Though I don't remember being able to watch him in action, construction was in my grandfather's blood, so maybe it somehow got into my genes, too?  But, I mean, how hard could it be, right?  A couple of nails here, a little mortar there, lay the stone like so, a little sweat labor and voila - paradise created!  Right? Hahahahaha!

I had a little tiny area for my patio, about 10' by 14'.  I had inherited it with an already laid floor made up of 12" square red pavers.  They were a little uneven and it was just kind of drab with a few bedraggled weeds poking through here and there.  But, when I looked at that barren little area, I saw a tall white lattice fence along two sides strewn with pale pink climbing roses, or honeysuckle, or jasmine, or morning glories or maybe even a nice red bougainvillea.  I just couldn't decide what I wanted most and decided to leave those types of details for later.  And, in front of the lattice walls, I saw warm yellowish-reddish-orangeish brick planters filled with plants and flowers.  And tucked in the corner at their junction, a raised area with a little patio table and a couple of chairs where I could relax at the end of a long day and enjoy a glass of fresh-squeezed peach lemonade (the recipe I use is at the end of this post) or a nice glass of wine and dinner.  Under my feet, I pictured a floor of pale yellow buckskin flagstone interspersed with irish or scottish moss or creeping thyme or perhaps baby tears moss. Again, I just couldn't decide, well, there'd be plenty of time for that later.  In the corner "kitty-corner" opposite from the table area, I wanted a quiet, peaceful little pond with a little fountain cascading soothing water sounds.  And, perhaps a two-seater glider or a little free-standing swing against one wall of the lattice directly opposite the pond (right next to the raised area for the table).  Someplace to relax and read a book or just while away an afternoon in quiet contemplation.  I know, I know, I said the area was only about 10' by 14', but on paper, it looked like it should work, a little snug, but do-able . . .    :-)

So, I started making my lists.  Lists for what would I need to get for the lattice walls and to hold them up and in place.  What I would need to get for the brick planters and for the edging.  What I would need for the pond and the flagstone.  From brick to stone, 2x4s to lattice panels, concrete to mortar, screws to basket hangers and all the tools and accoutrements needed to accomplish all the tasks at hand.  And then I began shopping to see what kind of lattice would be available, what types and colors of brick and flagstone were available, the sizes things came in and started pricing things out.  I decided I had to have white lattice and as I mentioned before, I had my heart set on some yellowish, reddish, orangeish bricks, and some yellowish golden buckskin sandstone flagstone and was delighted to be able to find exactly what I had envisioned!

And bit by bit, I accumulated most of what I would need, although some of it would be purchased as I discovered I needed it.  I carted it all home, trip after trip after trip in my poor little car.  You would have thought I had a truck based on my purchases, and the looks on some of those employees faces when I pulled up and said "Load 'er up!", were priceless.  WHAT? ? ?  C'mon, you're telling me you've never see a Toyota Celica pick up truck before? ? ?  I can't tell you how many trips it took just to get all the brick and flagstone home.  And, to this day, I can not tell you how I managed to get those four 4'x8' lattice frames home.  I must have tied them to the top of that thing, but really I just can't imagine it working, the car was so small!  The poor little thing was loaded with so much stuff, the frame was practically riding on the wheels!  But, what a trooper!  She made every last trip without a hitch, though some of it was pretty slow going!   And on a couple of bumps, I could have sworn I saw some chunks of rubber tires go flying.

I think I was becoming a little famous or infamous, depending on your point of view, around the suppliers I visited (and I suspect I provided them with more than enough fodder for stories with which they regaled their friends over beer).  Could you cut these bricks as marked for me?  What kind of cement do I need?  Can you pour the cement into smaller containers for me?  Can you cut the 2x4s?   Can I please just look through one more stack of flagstone to find just the pieces I want?  And so on.  And the look I got when I was discussing how much sand I would need for my little project (which was 3/4 ton, by the way)!  The guy kept glancing dubiously at my car.  I'm pretty sure he thought I was going to try to load her up with sand!  I could hear him telling his buddies now, "That kook was back again and this time she wanted a scoop of sand in her trunk."  I was so tempted to ask him how many trips he thought it would take in my vehicle to move 3/4 ton of sand, just to see his reaction, but I managed to fight the urge.  I did take pity on the poor car and rented an actual pick up for that job.  I didn't want to have to try to clean sand out of the trunk carpet . . . 

I stacked all the 2x4s and lattice in the back.  I had bricks and flagstone stacked as neatly as possible in my driveway.  Stuff was everywhere!

I started trying to figure out in which order things would have to be done so I didn't end up with a problem and have to tear something out and have to redo it later.  After all, it would have been extremely difficult for me to have put the brick planters in before I put up the walls behind them.  (The walls were to hide the sheds bordering those two sides of the patio area, so I couldn't put them up from that side.)  And I decided it would be easier to buy a preformed pond rather than trying to free-form my own, but in hindsight . . . I'm not so sure it actually was easier!  With a free-form pond, you don't have to try to dig a hole that nearly exactly matches anything . . . except the shape you want.  However, after all the visits from the marauding raccoon that I told you about in my previous post, the preformed pond turned out to be the best choice for me!  At least he couldn't poke holes in it like he may have been able to do if I had used a flexible plastic liner.

So, anyway, it was a no-brainer that the first thing I needed to do was pull up the existing pavers and level the ground.   But, instead of building up the low areas, I decided to try to scrape off the high areas.  (If you're taking notes, please make sure to mark this next thing down as a "DON'T do it".)  What I learned:  Always make sure your patio area is a little higher than the surrounding areas.    :-)    Why is that you ask?  Well, you'll have less of a big pond to wade through later when it rains . . .  Oh, . . . and while we're at it, . . . there's this lovely stuff called sand that makes it much, much easier to level things out than trying to level out hard-packed dirt with a spoon.  Ok, I didn't really use a spoon, I just made that up, but the experience certainly felt like that's what I used.

Then I began laying things out in the area just to get an idea of how it was going to look and fit and to give me a better idea of where to start.  Looking around, I realized that I would need to get the lattice fence up first.  Then get the planters built.  And then lay out the brick border before I can put the sand down and level it off.  But, I also wanted to get the pond in so I could more accurately determine where that border would be and keep from messing up anything else while digging the hole for it.  And I realized I would have to figure out something to keep the brick edging straight as I put it down.

Early stages of planning and layout.  What a mess!

So, first up, I decided to get all the holes dug.  One for the pond and some for the 2x4 posts to hold the lattice walls.  So, off to the big-box DIY store I go to buy a post-hole digger and the pond in my big delivery vehicle.  

What a marvelous invention those post hole diggers are!  I actually had a lot of fun digging those holes!  That is, until I got to the last one.  (Get your pencils ready, this is another DON'T I learned the hard way . . . This is an important one!)  Do not dig ANYTHING until you call USA first!  So, there I was, feeling pretty good, thinking this is actually kind of a piece of cake, I'm down to the last hole and all of the sudden, I noticed these black thingys down in the hole.  I stopped and peered in a little closer . . . what the . . . heck? ? ?  Wires?  What are wires doing down there? ? ?  Well . . . scratching my head, I reasoned I was still standing, so it couldn't have been electric.  Maybe they were just left over from some other project way in the past?  While I was puzzling over it, I got a bad feeling.  I went inside and slowly picked up the phone and put it up to my ears.  Sure enough.  Deathly silence, there was no dial tone.  Over to the neighbors I go to borrow their phone.

It is a bit hard to see the wires - but, there is a black, J shape along the right and bottom
side of the hole, and two lighter colored wires coming down from the top right of the hole.

The phone company comes out, checks things out and tells me that I was extremely lucky.  Apparently, I had just missed the gas line by about a 1/2".  They gave me the "call before you dig" lecture, then proceeded to widen that hole to the size of the Grand Canyon so they could sit comfortably on the side of it to fix the line.  Don't get me wrong.  I was very appreciative that they came out so quickly.  And that they didn't charge me (though they explained just how steep the fine could have been . . . YIKES! . . . if I pulled this stunt again, next time I would be extremely poor at the end of it) but, dang, did they have to make the hole THAT big just to put a couple little lines back together!

After they left, I set about filling the hole back in, but not too much!  I still had to get the post in! (I suppose if I'm here long enough, I'll find out one day that I encased the phone line in cement when I seated the post.)  

Well, anyway, I am finally ready to seat the posts.  So, off I go to the home store to get some concrete.  Who knew there were so many choices!  What in the world did I need? Fortunately, there was a kind gentleman there who took pity on me and was extremely polite and helpful.  Though, I suspect deep down he was trying desperately to refrain from bursting into laughter and was already planning on how he would be able to entertain his buddies over cold beers with stories of the blond who came in that day.  I can hear it now, "So, this blond comes in . . ."  But, he remained very polite and professional and even gallantly helped pour the bags of cement into some plastic containers I had brought in because I suspected I would not be able to lift the bags as they were.  I was right.  

He said all I would have to do is pour the cement in the holes and then pour in the water and let it set.  So, I did.  I nailed a string to each side of the top of a 2x4 and hung washers on the other ends to aid in getting the posts plumb and poured the cement in, making sure the washers were hanging right along the post on all sides and then braced the post in position and poured the water in.  While it began to dry I went on to the next one, putting one of the lattice frames in between to get the spacing right.  One by one until they were all in.  Easy as pie!  Once the cement dried, I painted the posts and put up the lattice frames between them, securing them to the posts with screws.  I have to admit, I thought it did look pretty nice when it was done.  The tops were even pretty darn close to being perfectly level!  Woohoo!  Bring it on!  Get me a construction job!  I must admit, I was a bit impressed with myself!  Maybe I do have grandpa's construction genes after all!

Ok, now for the pond.  Off I go in my Celica truck and pick out my pond and grab a few bags of sand to fill in around the edges once the pond is in place.  Once home, I set the pond in place, trace it's contours in the dirt and grabbed the shovel . . .  and then I remembered my previous digging lesson and called USA.  It took them a couple of days to come out, but they approved the area I planned to dig, so then I dug and dug and dug.  And dug.  And then, dug some more.  Funny thing, hard-packed dirt apparently does not want to be dug.  And who put those roots in the way anyway? ? ?  I'm pretty sure they were made of steel.  I grab the post hole digger and use it to break stuff up a bit and then try to smooth it out a bit with the shovel.  I set the pond in to see if it works.  Nope, not nearly deep enough.  Dig, dig, dig.  Now?  Nope, not yet . . . still not deep enough.  Dig, dig, dig . . .  NOW? ? ? ?  Nope, keep going!  You gotta be kidding me!  By now, I feel like I am digging through cement with a feather.  Not getting anywhere fast.  I try setting the pond in again.  Finally!  Well, at least close enough.  So what if the top of the pond is about an inch above the ground.  Once the baby tears moss is in, who will know? ? ?  So, I put the pond in, level it up, pour some sand in around it to fill in the gaps between it and the dirt and snug it into place.  I try to mound up a little dirt around the top to close the gap, and I'm good to go!

This is my little pond in one of it's early stages.  See, there
really isn't enough room for a raccoon to swim in it! 

Ok, I'm on a roll now!  Let's lay some brick for those planters in front of that pretty lattice wall!  Off to the DIY store.  Same gentleman as before gets to help me pick out something to secure the bricks in place.  He shows me what I need and again, very helpfully pours the mortar mix into the plastic containers I brought.  The powder went everywhere.  What a mess he had to clean up when we were all done!  I hope no one dropped their drink!  Then he says "Just add water, mix it well, scoop some mortar onto the brick with a trowel and set it in place and scrape the excess off before it dries so it looks nice, even and concave between the bricks."  "Great!  Sounds easy!  How much water?" I ask.  He looks at me and says "Until it is the right consistency."  "Great!  What is that?" I reply.  He blinks and looks at me, and then blinks and looks as me some more, apparently taken a little aback that I shouldn't already know this, or perhaps he just didn't know how to describe it.  So, I ask helpfully, "Like peanut butter?"  "No, no not that thick."  "Like a milkshake?"  "Yes, that's it," he says happily smiling from ear to ear, "just like a thick, chocolate milkshake!"

So I get home and start to work.  I mix up the mortar and start slathering away.  Too bad he didn't tell me to use the handle of the trowel to smooth out the mortar between the bricks.  (Ok, here is another DON'T . . .  This is another really big don't.  It's important!)  Do NOT use your fingers to wipe off the excess mortar between the bricks.  Mortar is made of sand.  Sand, like in sand paper.  And surprisingly, just like when people use water to keep things from getting too hot and to keep the friction down when they are sanding some things, when your fingers are wet, you don't realize that your fingers are being sanded down.  So, when I stopped that day . . .  That long, long day, where I sat on the ground, laying brick after heavy brick.  And moved more piles of heavy brick over to the work area as I ran out of piles of heavy bricks.  I was tired.  And dirty.  And very, very sore.  My back was apparently the only part of my body left, because, at that point, that was all I could feel.  And it felt . . . BAD.  I crawled up the steps to the house, slithered into the bathroom.  And took a shower.  A nice, long hot shower.  And when I dried off, I experienced the worst pain my fingers have ever known.  I looked down.  And right where all my fingertips should have been, there was nothing but bloody stubs.  So, here is my two-part lesson in bricklaying . . . do NOT use your fingers to smooth away ANY excess mortar; and bricklayers, no matter what they make, do not get paid enough.

I probably should have taken advantage of that period in my life where I could have committed all sorts of crime and not have left any fingerprints, but I didn't.  I mean how often does one lose one's fingerprints?  The answer is, twice . . . well, ok maybe three times.  Apparently, some people are just slower learners than others.  We won't mention any names here, but don't blame my mom, she tried really, really hard.  You just have to look at what she had to work with!  Sorry, mom, sometimes I just ain't the brightest bulb on the porch!  

But the fun did not stop there!  This is just where I will leave off for now.  To be continued . . . 

Fresh-Squeezed Peach Lemonade

1 C Lemon Juice
1 C Sugar
4 C Water
Peach Nectar to taste (I usually use Kern's)

Wash your lemons.  While the lemons are still whole, it is easier to zest them, so cut, peel or zest some of the rind, avoiding as much of the bitter white pith as possible.  Squeeze your lemons.  Pour the lemon juice into a pitcher with 3 cups of the water and refrigerate. Put the sugar and the remaining cup of water in a small saucepan with the zest and bring to a boil, stirring occasionally. Let cool, strain and pour into the lemon juice.  Add peach nectar to taste.

For a pretty presentation, rim the glass with lemon juice and then dip in sugar.  Add ice and a couple of very thin lemon slices and pour in the lemonade.  Garnish with mint.  Yummmm!